
Before you begin, ensure you have your new, OEM-compatible Dell 33YDH battery, a Phillips-head screwdriver, an anti-static wrist strap, and a clean, flat workspace. This visual checklist walks you through replacing your Dell laptop battery safely and correctly. Perform all preparation and installation steps while the laptop is powered off.
✅ Preparation & Safety Checklist
- Critical: Power Down & Disconnect. Shut down Windows completely. Disconnect the AC adapter and all other cables (USB, HDMI, etc.) from your laptop .
- Critical: Perform Hardware (EC/CMOS) Reset. If possible, remove the old battery. Press and hold the power button for 15-20 seconds to drain residual power from the motherboard capacitors. This reset helps ensure a clean start for the new battery .
- Verify Your Replacement. Double-check your new battery’s part number (33YDH/PVHT1) and specifications (15.2V, 56Wh, 4-cell). Before opening your laptop, confirm it matches your old battery exactly .
- Safety Warning: Inspect Old Battery. Before handling the lithium battery you are removing, visually inspect it for any signs of swelling or damage. If bulging is present, handle with extreme care and recycle it appropriately . If it appears normal, proceed.
🔧 Physical Replacement Steps
Note: Steps 2 and 3 are highly recommended before installation.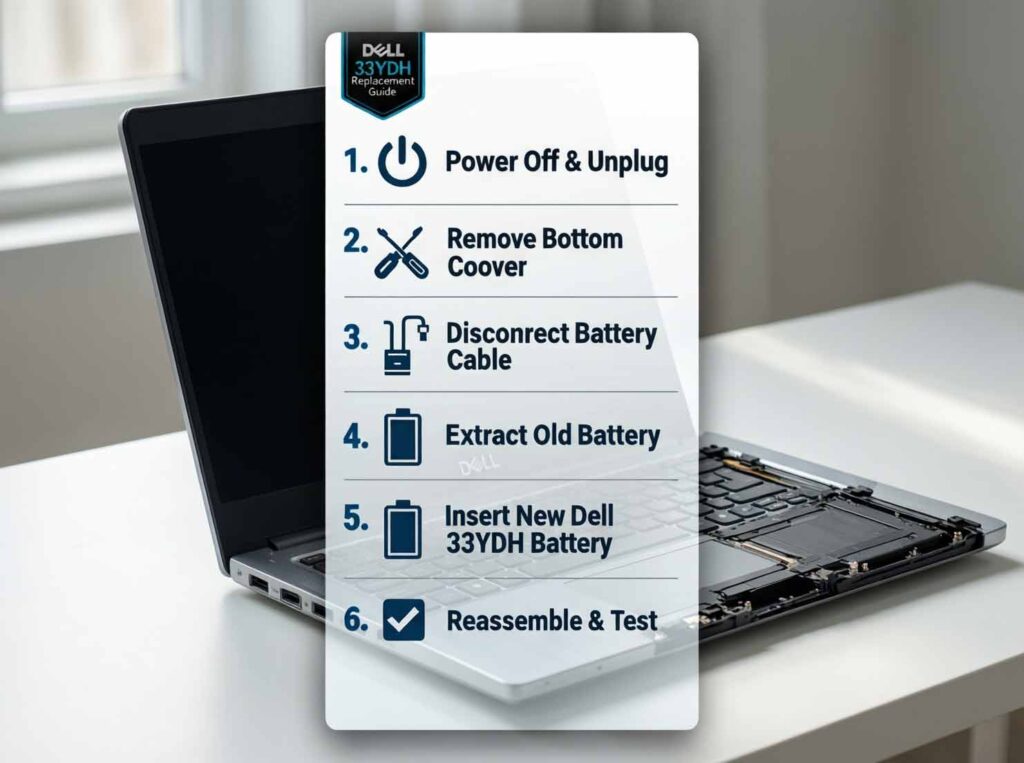
- Remove Bottom Cover. With the laptop upside down on a soft surface, use your Phillips screwdriver to remove all screws securing the bottom cover. Keep them organized. Gently pry off the cover starting from a designated notch or seam .
- Locate & Disconnect Battery Cable.
- Position: The battery is typically a large, rectangular block near the center or front edge of the motherboard.
- Connector: Find the battery’s power cable connector plugged into the motherboard. It is usually white or black and may be secured by a small clip.
- Disconnect and Remove. Carefully unplug this connector by pulling it straight out or releasing its clip. Do not pull on the wires. Once unplugged, remove any screws securing the battery to the chassis, then lift it out .
- Install New Battery. Place the new Dell 33YDH replacement battery into the compartment. Secure it with the screws you removed. Then, firmly reconnect the battery’s power cable to the motherboard port until it clicks into place. Ensure the connection is snug and fully seated .
- Reattach Bottom Cover. Place the cover back on and secure it with all screws.
🧪 Post-Installation Verification & Testing
- First Power-Up. Reconnect your AC adapter. Press the power button to turn on the laptop. Enter the BIOS by pressing F2 repeatedly at the Dell logo. In BIOS, verify that the system correctly recognizes the new battery and its charging status.
- Initial Windows Setup. Let Windows boot normally. It may take a few minutes for the system to fully recognize and calibrate the new battery. You can open the Dell Power Manager application to view the new battery’s reported health and status.
- Run Built-in Diagnostics. For a thorough hardware check, restart your laptop and press F12 to access the One-Time Boot Menu. Select “Diagnostics” to run the Dell Pre-Boot System Assessment (PSA), which will test the battery and charging system.
- Battery Calibration (Optional but Recommended). For best initial accuracy, fully discharge the battery (use the laptop until it shuts down), then charge it uninterrupted to 100%. Repeat this cycle once or twice to help the internal gauge report capacity correctly.
After the first full charge/discharge cycle, generate a Windows Battery Report. Your new battery should report a design capacity close to the typical 56Wh Dell Studio XPS 1640 Battery and a full charge capacity very close to that value, indicating a healthy new cell.
Safety Reminder: Always use the correct AC adapter for Dell model. When your original or new battery reaches the end of its life (typically after 2-3 years or 500-1000 cycles), ensure it is recycled responsibly.